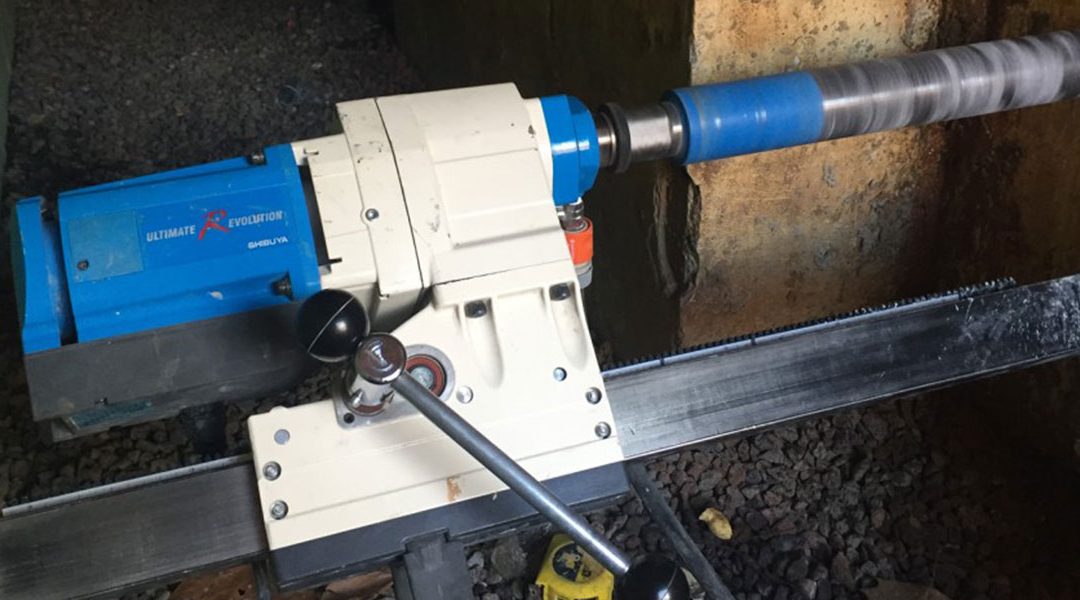
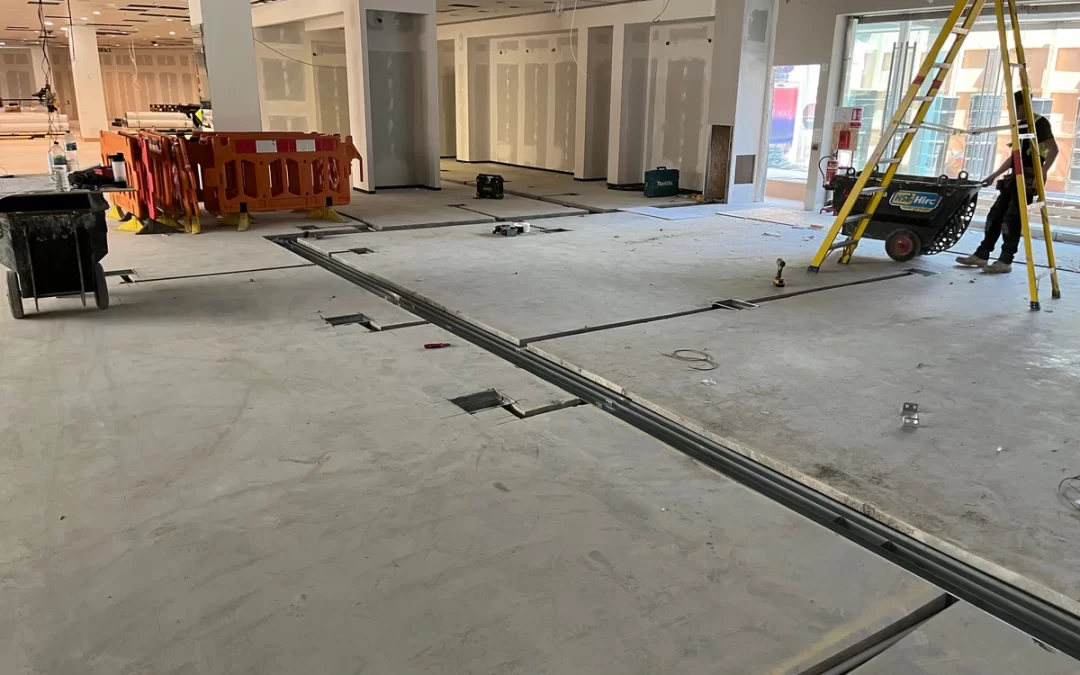
Imagine you’re on a bustling Melbourne construction site, and the next big task is running pipes and cables between floors. That’s where service riser core drilling comes in. It’s the precise way to bore vertical holes through slabs and walls so plumbing, electrical and HVAC systems can snake through a building.
In this guide I’ll walk you through everything about service riser core drilling, what it is, how it’s done, and why it matters for your Melbourne project. We’ll keep it friendly and jargon-free, just like we’re chatting over a coffee about the coolest trends on site.
What Is Service Riser Core Drilling?
So, what exactly is a service riser? In construction, a riser is basically a vertical shaft that carries services (electrics, water, ducts, etc.) from one level of a building to another. Core drilling is the method we use to create those shafts: workers use a diamond-tipped drill bit to cut perfectly round holes through concrete slabs or walls.
It’s much cleaner than smashing or chipping away concrete, and it leaves behind neat holes for your pipes or cables. Think of it as sculpting concrete to make way for the building’s vital services.
Doing this right is crucial in multi-story projects. A core-drilled hole might be only a few centimeters wide (for a single pipe) or up to a meter across (for a big service bundle or duct). Using a service riser core drilling approach means each hole is smooth, precise and exactly where it needs to be. There’s no doubt why it’s essential on major builds.
Let’s talk about the benefits. You could hire a hammer drill or jackhammer, but those are noisy and crude. A core drill is like the Swiss Army knife of drilling, versatile and tidy. Here’s why I often suggest it:
Clean, precise holes: Diamond bits cut cleanly, so your pipes slide in without fuss or extra chiseling. No cracks or chunked edges.
Preserves the core (if needed): The hollow bit often pulls out a concrete core. Sometimes engineers test this sample for strength or quality. (Bonus: you don’t usually need it, but it’s a handy feature.)
Versatile sizes: Bits range from tiny (10–20mm for cables) to huge (several hundred mm for big conduits). See table below for common sizes.
All angles: You can drill straight down from a ceiling, up from the floor, or even at a tilt if the situation demands it. Some rigs even drill upside-down, underfoot, if you need a hole from underneath a slab.
Less vibration: Compared to percussive methods, core drilling is smoother, especially when the rig is securely anchored. This means less risk of cracking nearby concrete or dislodging tiles.
Below is a quick reference for typical hole sizes and drill setups:
Hole Diameter
Drill Rig / Bit Type
Common Use
10–50 mm
Handheld electric core drill
Single cables or small pipes
50–150 mm
Mounted electric core drill (mobile rig)
Standard riser pipes, cable bundles
150–300 mm
Larger electric/hydraulic core rig
Multi-service risers, large pipe clusters
300 mm+
Stationary hydraulic rig (anchored)
Major service shafts, HVAC ducts, bulk penetrations
This shows why core drilling is usually the best tool for service risers: it’s tailored to the hole size, and the machines can be set up for any building situation.
Tools and Techniques of Core Drilling
Equipment:
At heart, it’s a motor, a stand, and a diamond core bit. The motor spins the bit at the bottom; the stand keeps it steady and vertical. The bits – often 10–1000mm in diameter have metal bodies with diamond segments at the tip. Diamond is the only material tough enough to slice through reinforced concrete cleanly.
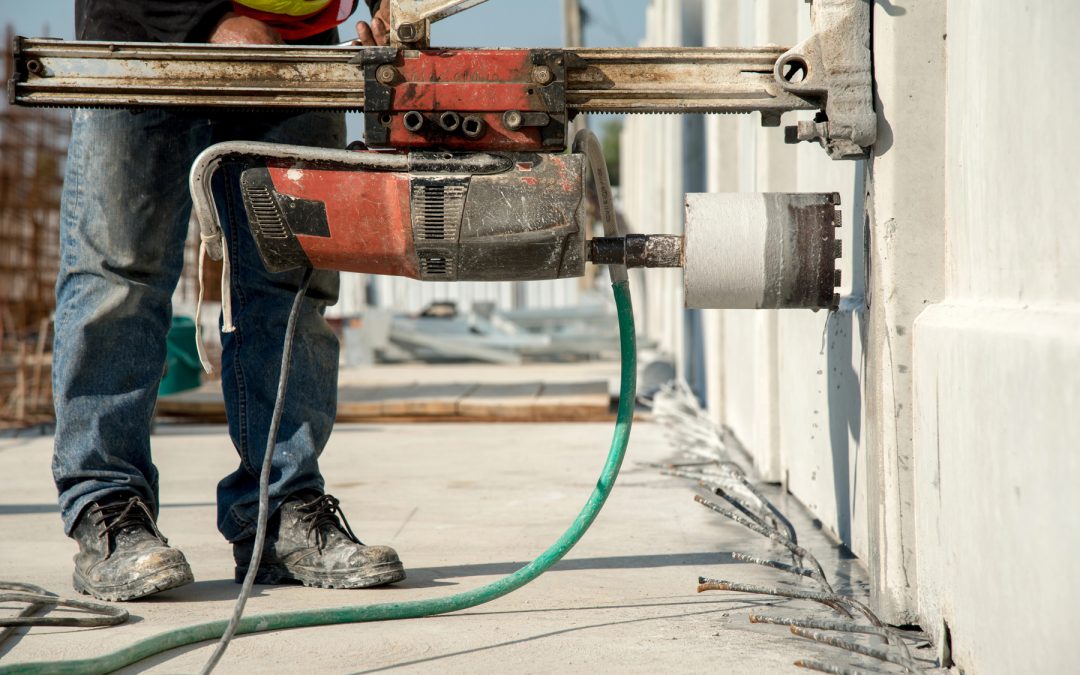
Water Supply:
You’ll notice a water hose hooked up to the drill. This isn’t for cooling you down – it cools the bit and keeps dust at bay. Wet drilling sprays water onto the bit, which prevents overheating and dramatically reduces airborne silica dust. On a Melbourne site, safety regs practically demand this. It’s a real win-win: less lung hazard and longer bit life.
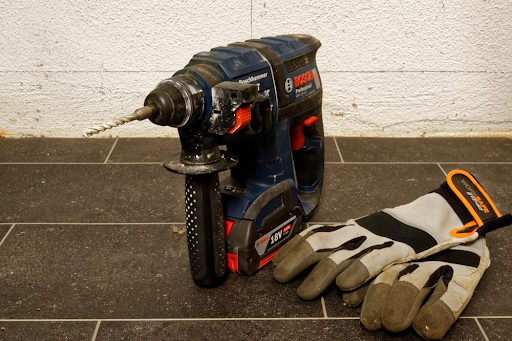
I often show apprentices pictures like this [Bosch impact drill and gloves] to emphasize safety and the right gear: always wear gloves, ear protection, and eye protection when drilling. The water hose might look like a tangle, but trust me, it’s doing the heavy lifting on dust control. Modern rigs also often have vacuum rings to suck up slurry for an even cleaner job.
Setup:
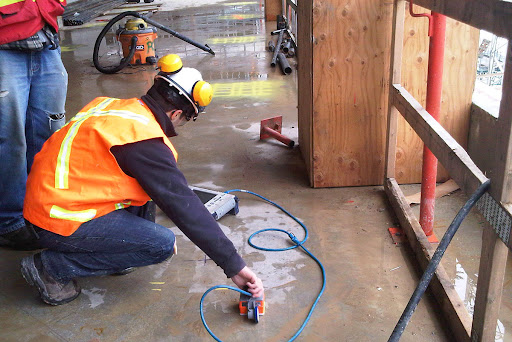
Before drilling, scan the area. Melbourne concreters use ground-penetrating radar (GPR) or service locators to find rebar, conduit, or pipes hiding under the surface. You definitely don’t want to drill into a gas line or live cable. Once clear, secure the drill stand. There are two ways:
Bolt-down: We literally bolt the drill base into the concrete using expansion anchors. This is rock-solid.
Vacuum stand: For quick jobs, a powerful vacuum suction pad can hold the stand in place. (WorkSafe notes that this is okay if the surface seals well and the vacuum is monitored, otherwise bolts are safer.)
Then position the bit, apply a trickle of water, and start the machine. High-torque, low-speed you don’t want to spin too fast or the bit will wear out prematurely. Push steadily and let the drill do the work.
Drilling:
Steady, controlled pressure is key. If there’s rebar (steel), the diamond will grind through it, but it can be tougher, so be patient. You’ll see a concrete cylinder (the core) stay inside the bit. When you reach full depth, stop and reverse the drill: the bit will pull out, often lifting the core out too. On a slab, sometimes the core falls through; on walls, it usually comes free.
Afterwards:
You’re left with a perfect hole. Sometimes it needs cleaning; a quick vacuum or hose rinse clears any slurry. If it’s a floor hole, debris drops through but keep an eye if there’s anything delicate below.
Planning and Safety – No Surprises
Never underestimate prep! On a Melbourne build, you need permits or council notifications for some work, especially if it’s a high-rise or historical site. You’ll fill in a Safe Work Method Statement (SWMS) for “high risk construction” , basically a plan documenting that you’ve done scans, risk assessments, etc.
Key safety tips I follow (and you should too):
Scan first: Always GPR or service location. It’s amazing how many buried cables are forgotten in plans. Better safe than shocking.
Secure the rig: We talked bolt vs vacuum. If using a vacuum, I always double-check the seal. That extra suction tank or regulator on big rigs is there so you have a few seconds to stop if power cuts – a critical safeguard.
Watch for hazards: Dust (silica), noise, entanglement (keep hair, gear, and loose clothing away from the spinning bit). Melbourne regs mandate PPE and often breathing protection if ventilation is poor.
Work area: Keep the whole area taped off. Falling chunks or a wandering core can injure someone.
Electrical safety: If you’re drilling near conduits, it’s wise to shut off power or clearly mark live lines. Core bits cut through any metal, live or not.
Working at height: If drilling a ceiling or floor from above, use guardrails and harnesses as needed. The high-rise skyline is no joke.
By following the WorkSafe Victoria guidelines and taking these steps, you avoid nasty accidents. In fact, WorkSafe recommends treating core drilling like any other “specialised equipment” task: if it can go wrong, plan how it won’t.
Local Melbourne Considerations
In Melbourne, we have a few local wrinkles:
Concrete type: Older buildings may have brittle Victorian-era concrete or even stone. New slabs use modern mixes. Know what you’re drilling into. Diamond bits handle both, but drilling through granite aggregate can take longer than softer aggregate.
Space constraints: Inner-city sites often have tight spaces. Smaller handheld rigs (with 10–20m hoses) are great for apartments or narrow sites. A busy CBD tower might use a big tracked drill with a stand.
Noise hours: If you’re coring in an apartment building, council noise rules (usually off-hours restrictions) may apply. Core drilling is quieter than jackhammers, but still loud enough for a startled pigeon.
Permits: For big penetrations (say, drilling basement walls), local councils sometimes need to inspect or approve. If the hole is near a footpath, traffic control may be needed. Factor this in, and always have an electrician or plumber on standby to remove any services.
Weather: Water is used in drilling, so mud can be a slip risk. In rainy seasons, ensure good footing; in summer, the drill and water pump can run hot, so hydration for the crew is a must.
Overall, Melbourne’s building scene loves core drilling. Whether it’s a new office tower, a school upgrade, or a mall renovation, the precision and speed of core drilling save heaps of time. You’re literally slicing right through concrete like a hot knife through butter (if that knife were diamond-tipped).
Tips and Tricks
Here are a few insider tips from years on the tools:
Prescan in 3D: Modern teams sometimes use 3D scanning or imaging in addition to GPR. It’s like a CT scan of the slab and can show rebar grids visually. If your project is high-stakes (say, a heritage building), it’s worth the investment.
Dry vs Wet: Most core drilling in construction is wet (with water). However, small handheld bits can do dry coring in non-ductile concrete if fitted with a dust extractor shroud. In a quiet interior job, that might be handy. But in Melbourne, with our strict dust laws, we usually stick with wet.
Minimize slurry: If you’re working indoors, slurry can be messy. Attach a vacuum ring around the bit. Many rigs have these rings that connect to a shop-vac. It cuts cleanup time to nearly zero.
Watch the clock: Core drilling isn’t super fast on big holes. A 100mm hole might take a minute or two; a 300mm hole could be 10–15 minutes of actual drilling. Factor setup and removal in your schedule. On a 3m slab, depth matters: some rigs struggle with very deep cores, so check bit length vs slab thickness.
Multiple holes: If you have a bank of holes (like many bathrooms on each floor), do them logically: either top-down so debris falls, or ensure someone clears cores between floors to avoid accumulations.
Emergency plan: Keep first aid kits handy. And for working alone (as Aussie Safety guidelines say, it’s riskier), use radios or check-ins every 30 mins if you’re solo.
These little details can make the difference between a smooth drill day and a frustrating one.
Conclusion
So that’s the lowdown on Service Riser Core Drilling in Melbourne. It’s a fascinating mix of technology and technique drilling perfectly round paths through solid concrete so buildings can breathe with plumbing and power. Whether you’re a project manager planning the next high-rise or a curious homeowner watching tradesmen at work, understanding core drilling gives you insight into what’s happening behind the walls.
In short: core drilling is safe, precise, and flexible. Follow the safety rules (WorkSafe Victoria’s guidelines cover it all), prep with scans, and use the right gear. That way, the holes you drill become the smooth arteries of your building’s vital systems.
Ready to make some holes? Give us a shout for expert service riser core drilling in Melbourne that keeps your project moving. Whether you have a single floor penetration or dozens of multi-story shafts, a well-executed core drill job can save time and headaches. And remember drilling a concrete hole isn’t just a step in construction, it’s making way for everything from your morning coffee to emergency sprinklers.
We’ve covered it all now, go forth and drill with confidence!
FAQs
What is a service riser core drilling? It’s drilling a vertical hole through concrete to create a service riser—a shaft for pipes, cables, or ducts between floors. It allows clean, precise openings for plumbing and electrical systems.
How large can the holes be? Core drill bits can range from a few millimetres up to 1000mm+. Common service riser sizes are 50–300mm, while larger holes often require hydraulic rigs and slab-mounted setups.
Is core drilling noisy or messy? It’s quieter and cleaner than jackhammering, producing a steady drilling hum instead of loud impacts. Some water slurry is created, but proper control methods keep the mess minimal.
How long does drilling take? Small holes can take just a couple of minutes, while larger ones may take 10–15 minutes plus setup time. For planning, allow around an hour per large hole including prep and cleanup.
What if I hit pipes or rebar? Scanning helps avoid this, but if you hit something, stop immediately. Rebar can usually be drilled through, but pipes or major obstructions may require relocation or manual removal.
Do I need a permit? Usually not for standard service holes, but regulations can vary. Large structural penetrations or restricted work hours may require approvals or compliance with site safety plans.
Concrete scanning – it might sound like a geeky detail, but trust me, you don’t want to skip this step. Imagine firing up a saw or jackhammer on a brand-new job only to slice through a hidden cable or topple a wall. Not fun.
Concrete slabs hide all sorts of surprises: rebar, post-tension cables, electrical wires, water pipes, gas lines – you name it. Before you cut, core or drill, it pays to know exactly what’s inside. In this article I’ll walk you through seven solid reasons why concrete scanning on your Melbourne construction or renovation site is a must.
Before you even think about drilling or cutting, getting an Expert Concrete Scanning Service in Melbourne gives you a clear, real-time view of what’s hiding beneath the surface. It takes the guesswork out of the job and helps you avoid costly surprises like hitting live cables, pipes, or structural elements. In a fast-moving Melbourne site, that kind of insight isn’t just helpful, it’s essential.
First off, what is concrete scanning? Think of it as a concrete “MRI” or “X-ray” (but way faster and safer). Using ground-penetrating radar (GPR) and other sensors, concrete scanners send radio waves into the slab.
These waves bounce back to the detector when they hit something different (steel, cable, void, etc.). The scanner then builds a map of what’s under the surface in real time. It’s a non-destructive, non-intrusive way to “see” the concrete’s insides without chipping anything out.
Ground-penetrating radar is the go-to tool; it can image up to several meters deep, giving clear 3D visuals of rebar mats, conduits, and anything else hidden underground or inside slabs.
What’s that mean for you? Well, you avoid blind drilling or cutting. And you find trouble before it finds you. Here’s why skipping that scan can be a nightmare.
1. Protect Your Crew from Hidden Dangers
Let’s be blunt: cutting into surprises is dangerous. If you slice through a live electrical conduit, someone could get electrocuted. Hit a high-voltage cable or gas pipe and you risk fire or explosion.
And don’t forget about those post-tension steel strands. Post-tension cables store immense energy – if you accidentally cut one, it can whip or explode out of the slab like a giant metal snake. That’s a recipe for severe injury or worse.
Concrete scanning detects these hidden hazards before you grab the saw. The scanners will show you exactly where live wires, metal pipes or tension cables are. This isn’t guesswork; it’s clear evidence on a screen.
You can mark those spots, drill elsewhere, or take extra precautions. Basically, you’re turning a deadly guessing game into a safe, planned job. In short, scanning = safety. Without it, cutting blind could send sparks flying – and not the good kind.
Why risk it? Scanning spots electrical cables and gas lines in advance.
Live wires? Done deal – mark ’em out.
Post-tension cables? You’ll know exactly where they lie (avoiding a potential catastrophe).
Voids or weak spots? They show up on the scan too, so you won’t fall through an unexpected hole.
Imagine a magnet tipped with danger underneath your slab. Concrete scanning is like checking that magnet with a detector, so you’re not walking into it unawares. We once had a project in Melbourne where a slab scan revealed a criss-cross of steel beams and pipes we never expected; drilling blindly would have hit something important. With scanning, our crew avoided all those cables and stayed safe.
2. Preserve Structural Integrity (No Surprise Damage)
Concrete structures rely on hidden reinforcements to hold things up – primarily rebar (steel bars) and tensioned cables. These aren’t optional; they’re vital. If you accidentally slice through them, the slab can lose strength and even crack or collapse later on.
Think about it: rebar holds concrete together, and post-tension strands keep floors rigid. If cut wrongly, you weaken the foundation of the building. Concrete scanning protects the slab’s inner skeleton. The scan will highlight exactly where every piece of reinforcement lies.
Then your cuts or drill holes can be made in safe spots clear of anything critical. You’ll avoid chopping through that rebar mesh or those tensioned cables. In practical terms, that means no surprise cracks, no sinking slabs, and no angry phone calls from engineers or building inspectors.
A cracked or collapsing slab isn’t just ugly – it’s illegal. Melbourne’s building codes demand a safe structure, and ruining rebar could violate those codes. By scanning, you show that you’re respecting the design and following proper safety practice. You keep walls upright and beams sound.
In short, scanning = structural peace of mind. Skipping it is like cutting your own brake lines. Not advisable if you want to stay out of trouble (or lawsuits!).
3. Avoid Massive Repair Bills and Delays
Picture this: you break a pipe or conduit while cutting. Now the site is flooded or has no power, and work grinds to a halt. Fixing that mistake could cost tens of thousands – plumbers, electricians, and concrete patch crews all have to swoop in. Not to mention the downtime while everything is fixed. Every day of waiting costs you money in labour and liquidated damages.
Concrete scanning is cheaper insurance than a repair. It saves money in three big ways:
No Surprise Fixes: By knowing where all pipes and cables are, you avoid hitting them. That means no expensive plumbing or electrical repairs mid-job.
No Down Time: A scan keeps your schedule intact. When you drill with confidence, you don’t have to stop the job to call in specialists or redesign the work.
No Penalties: Delays can trigger contract fines (liquidated damages) or extra overhead. Staying on schedule means no penalties.
For example, scanning lets you plan every cut or hole so there are no costly “oops” moments. If your scanner flags a thick cluster of pipes behind a concrete wall, you can reroute your project plan instead of scrambling for a fix.
Even common sense creeps in: drilling blindly might save a little time at first, but as soon as something goes wrong, that “shortcut” bites back with compound interest. Trust me, the upfront cost of a scan is peanuts compared to an emergency repair bill.
4. Stay Efficient and Keep Your Project on Track
Speaking of saving time, think of concrete scanning as an investment in efficiency. It might feel like an extra step, but in practice it speeds everything up. How? Because it turns your crew’s day from frenzied guesswork into a smooth operation.
Without scanning, the fastest cut can become the slowest nightmare. Every unexpected hit – a water line, a critical rebar – forces an unscheduled pause: stop work, figure out the issue, fix it or redo the plans, then resume. That can eat hours or days.
With scanning, you do a 10-minute scan and instantly have a map of hazards. Now every cut or core is done right the first time. Your team knows exactly where to cut and where to avoid. That confidence keeps hammers swinging and saws buzzing on schedule.
In tight project schedules, scanning is like checking your GPS before a drive – it helps you avoid traffic jams (in this case, “traffic” of pipes and rebar) and get to your destination fast.
Most concrete scanning results are ready same-day: as soon as you lift the scanner, you’ve got marks on the slab telling your crew where it’s safe to dig. It keeps things flowing, deadlines met, and the client happy.
Remember, on a construction site time is money. Every hour lost is an hour you’re paying bills for. A thorough scan can pay back in speed (and fewer headaches) on day one.
5. Comply with Safety Regulations (Cover Your Arse)
Down under, the laws are pretty clear: you must identify hazards before you dig. While there isn’t a law that explicitly says “you must do concrete GPR scanning,” building and safety regulations broadly require that you manage risks in high-risk work (and blind drilling is definitely high-risk).
In Australia, safety isn’t something you wing — you plan for it. When I’m working on-site, I always make sure risks get identified before any cutting starts. That’s exactly what regulators expect too. According to official guidance from WorkSafe, you should always locate and manage hidden hazards before starting high-risk construction tasks. You can check their recommendations here. Using Concrete Scanning helps you stay compliant, avoid legal trouble, and keep your site running smoothly without unwanted surprises.
WorkSafe and Safe Work Australia expect that you take all practical steps to find what’s hidden before cutting.
WorkSafe Victoria’s guide to working near underground services recommends thorough locating of cables and pipes. (In other words, don’t just guess where they are.) By scanning, you’re following that advice.
If anything goes wrong on site, having documented scan results can show regulators that you used “best practice.” It’s the difference between saying “oops” and saying “we took every precaution.”
For big projects, contracts often mandate concrete scanning or service locating in the pre-work planning. Even if not written, inspectors and clients will expect it as a safety measure. By scanning, you’ll tick that “safe work practice” box.
The bottom line: skipping scanning can paint you into a corner if something breaks or if an inspector asks, “What steps did you take to prevent hits?” With a GPR scan, you have a neat answer and a clean conscience. Without one, you’re exposing yourself to fines, liability, or worse. It’s simply good risk management.
6. Achieve Pinpoint Accuracy in Your Work
Concrete scanning isn’t just about avoiding disasters; it’s also about precision. When you know exactly where everything is, you can work with confidence. This accuracy means cleaner jobs: holes drilled in the right spots, no messy re-drills, and perfect alignment. Your work looks professional and precise (no “scrap drill” patches where a pipe was just missed by a hair).
Think about it: in a building with densely packed utilities, guessing can put you nowhere near the right place. But with a scan, you see the whole picture. You’ll know the safest angle and depth for each cut. This is especially valuable for technical jobs like installing anchors, wires or pipes in existing structures.
Accurate scanning data helps engineers too. If a scan shows an unexpected cluster of cables, the structural engineer can adjust their plans before concrete cutting even begins. Everyone’s on the same page.
All this means better quality outcomes. You avoid the “I didn’t know it was there” excuses and rework. Instead you deliver an installation that fits perfectly the first time. Clients notice this kind of care, and it builds trust.
Table: Common Hidden Objects vs. Risks vs. How Scanning Helps
Hidden Object
Risk if Hit
How Scanning Helps
Rebar (steel rods)
Structural weakening, cracks
Maps rebar placement so you avoid it
Post-tension cables
Violent blowout, slab collapse
Marks exact cable locations
Electrical conduits
Electrocution, power outage
Shows live cable positions
Water/gas pipes
Flooding, explosion, fire
Identifies plumbing and gas lines
Empty Voids
Sudden collapse, uneven slab
Detects cavities and honeycombing
Communication cables
Service disruption, data loss
Locates phone/Internet lines
Foreign objects (trash, rocks)
Bolt damage, jams, unexpected obstructions
Finds miscellaneous debris
7. Sleep Easy – Peace of Mind
Last (but certainly not least), scanning buys you peace of mind. In construction, anxiety doesn’t build confidence. Scanning removes the nagging worry that you might hit something disastrous. You’ll feel like you’ve rolled back on a protective safety net.
Instead of starting work and crossing your fingers, you’ll start work knowing you have all the info. It’s a night-and-day difference. Your team will thank you (and so will your boss or client). You’ll be avoiding surprise injuries, cost blowouts, or angry neighbors (imagine accidentally knocking out the whole building’s power!).
As an Aussie builder once said, “It’s better to measure twice and cut once.” Here we’re measuring through that concrete first. The slight effort of scanning upfront keeps your site drama-free. When push comes to shove, reliability matters.
And don’t forget insurance: if something bad did happen, showing you did a proper scan can protect you from liability. It shows you didn’t cut corners.
At the end of the day, concrete scanning is about being smart, not paranoid. It’s an easy step that turns the unknown into the known. Why gamble with safety, schedule, or your bottom line?
Conclusion
Look, I get it – scanning might feel like one more thing on the checklist. But it’s a shortcut that literally saves lives, money and headaches. In a bustling Melbourne construction scene, you can’t afford the risk of hidden hazards. By making concrete scanning a standard part of your on-site prep, you’re working smarter and safer.
To sum up, concrete scanning protects people, structures and your bottom line. It’s about confidence. And remember, Australia’s safety rules expect this kind of precaution. Don’t gamble with what you can’t see. Instead, plan ahead: get a thorough scan, mark out those hidden lines, and cut with confidence.
If you’re about to start demolition, cutting or coring, make a call. Contact a professional scanning team to survey your site before you swing the hammer. In Melbourne, there are experienced crews ready to help – they’re like your concrete hazard detectives. It might just be the easiest insurance policy you can buy for your project.
Get ahead of the game: don’t skip the scan, and stay safe on site!
Frequently Asked Questions (FAQs)
Q: What exactly is concrete scanning and how does it work? A: Concrete scanning is a non-destructive method (usually using GPR) to detect objects inside concrete. It sends radar waves into the surface and creates visual maps of hidden elements like rebar, cables, and pipes.
Q: What kind of hidden hazards can concrete scanning detect? A: It can detect rebar, post-tension cables, electrical conduits, plumbing, and voids. Essentially, anything embedded in concrete that differs in density can be identified.
Q: Is concrete scanning safe for workers and the environment? A: Yes, it’s completely safe and non-invasive. GPR uses low-power radar waves with no radiation, making it harmless for workers, nearby people, and the environment.
Q: Is concrete scanning mandatory for Melbourne projects? A: While not always legally required by name, it’s often expected under safety regulations. It helps identify risks before cutting or drilling, ensuring compliance and due diligence.
Q: How much does concrete scanning cost, and is it worth it? A: Costs vary but are usually a small investment compared to potential repair costs. It’s highly cost-effective as it prevents damage, delays, and safety risks.
Q: How deep can scanners see, and do I need different scans for floors vs. walls? A: Most scanners can detect up to 500mm–1000mm or more depending on conditions. Different surfaces like walls or ceilings may require adjusted scanning techniques.
Q: Where can I get concrete scanning services in Melbourne? A: Many specialist companies offer scanning services across Melbourne. They can quickly assess sites and provide same-day results for construction or renovation projects.
Q: Can I skip scanning if I’m careful or experienced? A: No, skipping scanning is risky even with experience. Hidden elements may not match plans, and scanning ensures safety, accuracy, and avoids costly mistakes.
Imagine you’re renovating a Melbourne home or upgrading an office in the CBD, and suddenly you need to run a new pipe or cable through a thick concrete slab. Drilling a neat hole in concrete used to be a nightmare – jackhammers roar, dust flies everywhere, and walls crack. But with concrete coring services, the process is clean, quick, and precise.
In essence, concrete coring (also known as core drilling) uses powerful drills with diamond-tipped bits to cut perfect circular holes through concrete. It’s like using a scalpel instead of a sledgehammer – you get exactly the hole you need with minimal fuss. These services have become essential in modern construction because they make all sorts of installations (plumbing, electrical, HVAC, anchors, etc.) far smoother.
Concrete coring works by rotating a hollow, diamond-coated bit to cut out a cylindrical core of concrete. The bit is cooled with water and often paired with a vacuum to capture dust, so the site stays tidy.Unlike brute-force methods, coring leaves clean edges and intact surroundings.For example, a 100 mm hole for a plumbing pipe comes out perfectly round, with no jagged chips to patch later.
You can drill straight through floors, walls or even ceilings – sometimes at angles – without compromising the building’s integrity. In practical terms, this means electricians, plumbers and builders can install pipes and cables faster and with less demolition than ever before. (Not surprisingly, Melbourne’s builders often treat core drilling like an art form – precise and efficient.)
When it comes to specialist services, professionals abound. For instance, if you need holes for waste stacks, water lines or mechanical risers, you might engage Expert Concrete Coring Services in Melbourne – companies staffed by experienced crews who handle everything from 12 mm holes to meter-wide penetrations.
These experts use industrial rigs and scanning gear to map out exactly where to drill (more on scanning below). Their work ensures that critical systems (like fire sprinklers or sewer lines) slot into place without a hiccup. Even on big jobs – say a new apartment block or office fit-out – these core drilling teams can blast out dozens of holes in a day, keeping projects on schedule.
Modern concrete coring also starts long before the drill bit hits the wall. Today’s teams typically run a pre-drilling scan of the slab or wall to avoid surprises. Using 3D concrete scanners or Ground Penetrating Radar, they can pinpoint hidden pipes, wiring or rebar under the surface. This isn’t just good practice – it’s smart safety.
Melbourne builders know the last thing you want is to plunge a drill into a live cable or a support beam. By scanning first, the drilling stays on the money and on the safe side. This careful planning is part of why concrete coring is trusted over old-school demolition; it’s non-destructive and keeps the structure sound.
For electrical and data installations, the story’s similar. Installing conduit or cabling through concrete walls is a breeze with core drills – and again, specialists are on hand. If you need holes for cable trays or electrical conduits, you’d call on an Expert electric core drill service in Melbourne to do the trick.
They have the right-size bits and stands to bore through slabs and walls for wiring. Think of them as the magicians who make holes appear exactly where you want them, without turning the whole wall into rubble. This is a far cry from the days of chasing wires with grinders and hacksaws.
Key Benefits of Concrete Coring
Precision & Clean Finish: Core drills carve out perfect round holes, leaving smooth, clean edges. No more jagged cuts that need filling or repairing.
Minimal Disruption: Unlike hammers or chain saws, coring is surprisingly quiet and vibration-free. You won’t feel the whole building shake. This makes it ideal for live sites like hospitals or apartments where tenants are present.
Less Dust & Debris: Wet coring (using water) and vacuum systems dramatically cut down dust. The job site stays much cleaner, which saves cleanup time and keeps workers healthy.
Versatility: Core drills tackle concrete, brick, limestone—even asphalt or steel. They can operate horizontally, vertically, or even overhead, and come in sizes from a few centimetres to over a metre in diameter. So whether you’re putting in tiny anchor bolt holes or giant duct openings, there’s a bit for that job.
Preserves Structure: Drilling a neat hole is far gentler on the building than jackhammering. Surrounding walls, floors and tiles stay intact. This helps maintain structural strength and aesthetics, which is crucial in heritage renovations or finished interiors.
Speed & Efficiency: Core drills cut faster than manual methods. A skilled operator can make many holes in the time it would take to make one rough opening with a saw or hammer. Faster drilling means projects stay on schedule and (usually) under budget.
Cost-Effective: In the long run, precise drilling often reduces costs by preventing damage (and rework), cutting labour time, and avoiding the need for heavy demolition gear.
To see how coring compares to other methods, consider this quick comparison:
Method
Noise & Vibration
Dust & Debris
Precision
Typical Use
Core Drilling
Low noise/vibration (especially wet)
Very low (water/vacuum suppresses it)
High – round, clean holes
Drilling holes for pipes, cables, anchors
Concrete Sawing
Moderate (blade rotation noise)
Low to moderate (water-cooled blades)
High – straight cuts
Cutting slabs/structures for openings
Jackhammer/Breakers
Very high noise/vibration
High (dust & chunks fly)
Low – rough, irregular
Demolition or breaking up concrete
This table highlights why core drilling often wins out for installation work: it makes holes without making a mess.
Another useful way to break it down is wet vs. dry coring. In many Melbourne projects, you’ll see wet coring (with water) used for bigger holes because it cools the bit and captures dust. Dry coring (no water) is handy for small penetrations indoors where water might be an issue (e.g. near electrical gear).
In all cases, the drill bits are usually diamond-coated to cut fast through tough concrete, and they rely on solid rigs or even hydraulic drives for the really large-diameter cores.
Why Construction Pros Depend on Coring
Cutting-edge construction is all about efficiency and precision, and coring services fit that bill. In Melbourne’s growing construction scene, from high-rise apartments to hospitals and tunnels, you need solutions that work seamlessly. Core drilling fits the bill:
Compliance and Safety: Regulatory guidelines (like WorkSafe Victoria’s concrete cutting and drilling industry standard) insist on minimizing risk. Trained core drilling crews follow these rules by using proper scanning, barricades and protective gear. You could even say these professionals are WorkSafe‑approved magicians of the concrete world – doing a tricky job safely. For instance, WorkSafe Victoria explicitly outlines methods to control hazards like dust, vibration, and buried utilities when cutting or drilling concrete. By adhering to those standards, core drilling services help ensure work is done safely and within legal requirements. WorkSafe Victoria provides further detailed safety protocols for these operations.
Expertise: Modern coring rigs are high-tech. Some newer drills have laser guidance or digital monitoring so operators hit their mark every time. Companies continuously update their toolboxes with the latest systems (even IoT-enabled drills that send data back to the office!). Having a specialist at the wheel – someone who has drilled thousands of holes – means they know exactly how fast to spin the bit and how to move steadily. The result? A hole placed exactly where you want it, without guesswork.
Versatile Applications: If your project involves installing plumbing, electrical, fire protection, HVAC ducts, structural anchors, or even camera mounts, you’ll need holes. In fact, anywhere you see a neat round hole in concrete on a construction site, that’s likely the work of a core driller. These experts work on floors, walls, ceilings, roads and bridges alike. For example, to put in bollards at a store front or drainage pipes under a road, coring does the job cleanly. It even extends to special cases: under-water coring for dams, inverted drilling to bore from below, and more.
Sustainability & Cleanup: Concrete waste is a pain to haul away, and lots of noise upsets neighbours. Core drilling cuts down waste (because most of the core can sometimes be reused or tested rather than smashed to rubble) and keeps noise to a minimum. Wet coring recycles water rather than spreading dust. All this means less environmental impact and a smoother approval process in the city where rules are tight.
The bottom line? Concrete coring isn’t just a convenience – it’s often the only practical solution in modern building and renovation. It opens the door (literally and figuratively) to installing new systems without tearing everything apart. From cutting edge new projects to retrofitting historical sites, core drills make sure the job moves forward.
In practice, you might see this: a work crew rolls in with a tall core drill stand, parks it on the concrete, and starts drilling. Behind the scenes, they’ve already checked blueprints, scanned for steel and pipes, and chosen the exact bit size. The drill whines steadily, water pumps through it, and out comes a round plug of concrete (sometimes saved for strength testing). Next minute, the plumber or electrician slides a pipe right through the hole. Minimal fuss.
Construction professionals will tell you that the only way to know what’s in or under a concrete slab is to scan before you bore. By combining tech, skill and the right equipment, modern concrete coring services deliver that perfect hole every time. It’s a key piece of the puzzle in keeping projects efficient, safe and up to code – not to mention on time and on budget.
Conclusion
Concrete coring services have revolutionized how Melbourne builds and renovates. By drilling precise, clean holes instead of breaking up slabs, they save time, money and stress. These services come with layers of safety and expertise (think scanning for hazards, following WorkSafe guidelines, and using top-grade diamond equipment). Whether you’re upgrading a kitchen, fitting out an office or constructing a highway overpass, coring is the smart choice. It’s the difference between chaos and control.
Feeling convinced? The next time your project calls for pipes or wires through concrete, remember: the right core drilling team can make it easy. Chat with a trusted drilling specialist or ask your contractor about precision coring. You’ll get the job done fast, keep everyone safe, and avoid the nightmare of dusty, sleepless nights. Go on – give your construction project the precision it deserves.
Frequently Asked Questions
Q: What exactly is concrete coring (core drilling)? A: Concrete coring is a technique where a specialized drill (usually water-cooled and diamond-tipped) drills out a round “core” of concrete. This creates a clean, circular hole, perfect for things like pipes, cables or anchor bolts. It’s essentially precision drilling for concrete.
Q: Why use core drilling instead of a regular jackhammer? A: Core drilling makes a specific, neat hole without shattering the surrounding concrete. A jackhammer just breaks up concrete randomly, which is noisy, slow and damages a bigger area. Coring is quieter, faster for creating holes, produces less dust, and leaves intact edges that usually need no patching.
Q: Is core drilling safe? A: When done by trained professionals, yes. Core drill operators use safety gear and follow guidelines (like those from WorkSafe Victoria). They always scan for hidden hazards first and control dust and debris during drilling. Compared to old methods, coring is actually safer because it’s more controlled and causes less structural stress.
Q: Do I need to scan before core drilling? A: Absolutely. Best practice (and often a legal requirement) is to do a concrete scan first. Scanning with radar or sensors lets drillers see any steel rebars, pipes or wires. This avoids accidentally hitting something important. Concrete scanning keeps work safe and prevents costly mistakes or injuries.
Q: What’s the difference between dry coring and wet coring? A: Dry coring means drilling without water, so you get dry dust (often collected by a vacuum). It’s useful in places where water isn’t allowed (like inside a finished building). Wet coring uses a steady stream of water at the drill bit. This cools the bit and turns debris into slurry. Wet coring is common for larger holes and helps keep dust down.
Q: What kinds of projects use concrete coring? A: Tons of them! Anywhere you need penetrations in concrete: plumbing and drainage pipes in houses, electrical or data conduits in offices, HVAC vents in malls, anchors for bolting equipment, even sampling concrete in engineering tests. In Melbourne, builders use coring for new builds, renovations, roadworks, hospitals, schools – basically almost any construction project.
Q: How do I find a reliable coring service? A: Look for experienced companies in Melbourne that specialize in concrete drilling. Check that their crews are trained, insured, and have modern equipment (ideally with up-to-date scanning tech). Ask for references or reviews – a good coring company will show you past jobs and safety records. Always get a quote and make sure it’s based on scanning/site inspection, not just guessing.
You know that one thing that ruins a great room? The cable spaghetti. You mount the TV, you buy the clean-lined furniture and then a power lead dangles down the wall like it owns the place.
Concrete looks sharp and it feels solid, but it doesn’t “forgive” messy services the way plaster does. If you want that sleek, modern finish in Melbourne, you need a way to tuck wiring and small services out of sight—without doing anything dodgy.
That’s where professional concrete chasing in melbourne helps. I’ll show you what concrete chasing involves, why it suits modern homes, how tradies tackle it safely, and what it tends to cost.
What concrete chasing is and when you’ll use it
Concrete chasing means cutting a narrow channel into concrete or masonry so tradies can run conduit, cables, or small pipework inside the surface instead of across it. After the cut, you patch and refinish so the wall looks normal again.
You’ll see concrete chasing pop up in real life when you want: – wall-mounted TVs (power + data) – downlights, feature strips, and wall sconces – home-office data points (because Wi‑Fi can only do so much) – a tidy commercial fit-out that doesn’t scream “temporary”.
Chase size matters. A slim data cable needs far less space than PVC conduit, and plumbing needs more again. Some industry examples describe “single” and “double” chases around 25×25 mm and 50×25 mm—handy reference points when you scope the job.
Benefits that make it worth it
I’ll be honest: you don’t do this just because you can. You do it because you want the space to look intentional.
Concrete chasing gives you cleaner lines (no surface conduits), better protection for cabling, and a setup that stays out of the way in tight spots like hallways, garages, and busy workspaces.
It also aligns with the “young professional” reality: cleaner WFH setups, proper data points, and rooms that look styled instead of “someone hid a cord behind a plant and called it a day.”
How the process works
This part matters, because a good process turns concrete chasing into a clean upgrade—while a sloppy one turns it into a dusty regret.
Route planning and wall “rules”
First, you plan the route: where services start, where they finish, and how you keep runs short and straight. Every extra bend adds time and patching—and it often shows under paint.
If you chase masonry or fire‑rated walls, keep it conservative. Guidance based on AS 3700 notes that chases and recesses can affect wall performance, and one fire-design guide discusses shallow recess limits (for example, 30 mm max depth) and keeping horizontal chases to a minimum.
Locate the stuff you can’t see
Concrete can hide reinforcement, embedded services, and in some buildings, post‑tensioning. Some providers pair chasing with pre‑chase scanning specifically to avoid rebar, post‑tension cables, or live services.
If you suspect post‑tensioned slabs, you need extra care. Post-Tensioning Institute of Australia publishes guidance on safely locating and cutting penetrations through bonded post‑tensioned slabs after construction—so yes, you plan and mark before you cut.
Cut, break out, clean up
Trades typically use a diamond wall chaser to cut two parallel lines, then they break out the middle strip and clean the channel. A hire listing describes a wall chaser as an electric, twin diamond blade tool designed to recess pipes, cables and conduits, and a Melbourne hire spec lists around 40 mm max cutting depth with about 39 mm max cutting width.
Now the safety reality check: during concrete chasing, cutting can generate respirable crystalline silica dust. WorkSafe Victoria explains that crystalline silica sits in common building materials (including concrete and brick), and cutting or grinding can generate fine dust that can seriously harm health over time.
When I work with good operators, they treat dust control like baseline hygiene: on‑tool extraction, containment, and the right PPE. WorkSafe also talks about controlling risk by applying the hierarchy of control—not relying on PPE alone.
Insert image of: a wall chaser connected to a vacuum, with clean parallel cuts (close-up, satisfying).
Services go in, wall looks normal again
After the cut, the electrician or plumber installs the services, then you patch and refinish. Good making-good makes the chase disappear, which is the whole point.
If the work forms part of bigger alterations, you may need to think about permits. Victorian consumer guidance says you should check if you need a planning permit, and it describes the building permit as written approval from a registered building surveyor that allows building work to start.
Concrete chasing costs in Melbourne
I’ll give you the honest answer: nobody prices concrete chasing like a supermarket shelf. The wall, the access, the finish, and the dust controls all move the needle.
Many contractors price wall chasing by the linear metre, then adjust for depth, width, material hardness, and access.
A realistic budgeting framework
Use this simple stack when you compare quotes:
Total ≈ minimum charge / call‑out + (metres × rate) + scanning (if needed) + making good
For general concrete cutting, an Australian cost guide links per‑metre price to depth (for example, around $20 per metre at 100 mm depth and around $30–$50 per metre at 300 mm depth). Chasing often runs shallower, but your final concrete chasing quote can still climb once you include setup, dust control, and restoring finishes.
Tool hire costs also show why time‑based pricing makes sense. One hire listing shows a day rate around $185, and a Melbourne hire outlet lists a wall chaser (with vacuum) around $180 for a full day.
Cost driver
What it changes
How you keep it under control
More metres + more bends
More cutting + more patching
Keep runs short and straight
Bigger depth/width
Slower cutting + heavier breakout
Match chase size to the service
Reinforcement / post‑tension risk
Extra locating/scanning
Confirm what’s inside before cutting
Higher finish expectations
More making good
Decide who patches and who paints
Conclusion
Concrete chasing gives you a cleaner, more modern finish—hidden cables, calmer walls, and rooms that look designed instead of “randomly wired.” But you only get that payoff when you plan the route, respect wall limits, and treat dust control as non‑negotiable.
If you’re planning a renovation, get a detailed quote for concrete chasing that breaks down setup, metres, dust control, and making good. Send a quick layout of power/data points, ask the right questions, and line up a crew that can chase cleanly and finish like they care about your walls.
Frequently asked questions
How deep can you cut for concrete chasing?
Many hire specs for wall chasers list around 40 mm max cutting depth, which often suits common conduit and cable runs. If you need deeper cuts, you’ll likely need different gear and a tighter plan.
Can I DIY with an angle grinder?
You can, but you’ll create serious dust and you can take on safety and structural risks fast. A concrete cutting cost guide even notes that DIY can end up close to hiring a tradie once you count tools and waste handling—without the experience.
Do I need scanning first?
I don’t treat scanning as mandatory for every small job, but I treat it as smart when you suspect reinforcement, embedded services, or post‑tensioning. Some providers explicitly recommend scanning before chasing to avoid hidden hazards.
How do you control silica dust?
I look for on‑tool extraction, containment, and proper PPE. WorkSafe Victoria explains that cutting and grinding silica‑containing materials can generate fine dust that harms health, and it points to controlling risk through higher‑level measures where possible.
Will this weaken my wall?
Yes, it can—because you remove material. Keep chases minimal, avoid long horizontal cuts, and check requirements for structural and fire‑rated walls. A fire-design guide based on AS 3700 shows that chases and recesses can affect performance and highlights limits used in design checks.
How long does it take?
Cutting can move quickly, but setup and cleanup often take a big slice of the time—especially in occupied spaces where dust control matters. Bigger scopes often run faster per metre because the crew spreads setup time across more work.
Do I need permits?
For bigger renovation works, Victoria’s consumer guidance says you should check with local council about planning permits, and it describes a building permit as your licence to build. If you feel unsure, ask a building surveyor or council before you start cutting.
The streets of Melbourne are full of surprises. You might never thank the bollard on the corner for keeping you safe from a speeding car, but I sure do. Bollards – those sturdy little posts – quietly do a big job: protecting pedestrians, buildings, and public spaces.
If you’re a young professional in Melbourne looking to jazz up or protect your space, you might be thinking, “Where do I even start?” Trust me, you’re not alone.
Is a removable bollard worth the extra coin? Do you need steel or plastic? I’ve dug into all the answers with a Trusted Bollard Installer in Melbourne so you can get it right the first time.
Simply put, a bollard is a solid post – often made of steel, concrete, or tough plastic – that you sink into the ground. It might look unassuming, but it’s designed to stop cars from going where they shouldn’t. Think of bollards as your property’s silent bodyguards. They might even add a slick design flair to your property if you pick the right style.
Why would you splash out on bollards? Safety is the headline. You’re preventing cars from crashing into areas meant for people or assets. But there’s more: bollards can organise traffic flow (say goodbye to careless parking), help meet local regulations, and even give your insurance a thumbs up (yes, insurers like seeing safety measures). Plus, they can look great, which I know is a big tick for many of us.
Before you pick your post, think of its job. Will it always stay put, or do you need it to be removable for deliveries? A fixed bollard is bolted in and permanent, while a removable one (like a sleeve system) can be taken out when needed. We’ll cover these in types below, so you match the post to the purpose.
Materials matter too. Heavy-duty jobs often use steel – shiny stainless or powder-coated in a trendy colour. For lighter duties, a chunky plastic bollard (sometimes filled with water or sand) might do the trick. Don’t forget taste: timber or cast iron bollards can fit heritage designs, while bold-coloured plastic works for modern flair. Either way, there’s a style to suit.
Finally, let’s get real about the rules. State planning guidelines note that barriers (like bollards) should control vehicles without hindering pedestrian flow. That means no blocking footpath space or sightlines. Check with your local council (like the City of Melbourne) before you dig a hole. A quick permit or chat with council planners can save you fines and headaches down the track.
Types of Bollards and When to Use Them
Bollards come in several flavours. The main types I see are:
– Fixed Bollards: Permanently set in concrete. Great for long-term protection (think building corners or café seating areas). – Removable/Sleeve Bollards: You place them in a sleeve when needed and lock them in. Perfect for driveways or loading zones that need occasional vehicle access. – Retractable/Collapsible Bollards: These can be lowered into the ground (often with a key). Useful for property access control while staying out of sight when not in use. – Flexible/Spring-Loaded Bollards: These bend on impact and spring back up. Ideal for low-speed areas (like parking lots) because they cause minimal damage to vehicles and survive minor bumps.
To pick the right type, match it to your needs. For a storefront café, fixed or flexible bollards are common. For a garage entrance you drive through daily, a removable bollard might make sense. Retractable bollards shine in office parks for after-hours security.
Materials and Styles
Beyond type, material is key. Most high-impact bollards are steel (stainless or powder-coated). They stop cars dead and can be painted any colour. For softer needs or crowd control, plastic or rubber bollards (often hollow and filled with sand) can mark boundaries on a budget. Concrete bollards are ultra-strong but heavy and plain. Sometimes designers use timber or cast-iron bollards for heritage areas or parklands.
Here’s a quick comparison to jog your memory:
Bollard Type
Material
Typical Use
Notes
Fixed
Steel, Concrete
Permanent protection (shops, plazas)
Strongest; highly visible
Removable (Sleeve)
Steel, Plastic
Access control (driveways, events)
Requires sleeve; convenient access
Retractable
Stainless Steel
Regulated access (parking lots)
Sleek look; manual operation
Flexible
Plastic (spring)
Parking aisles, parks
Bends on impact; low maintenance
Installation Process Overview
Installing bollards isn’t just hammering posts; it’s about doing it right. Here’s the lowdown:
Site Prep: I mark the locations and check for underground utilities (always call “Dial Before You Dig” to be safe).
Dig and Set: For fixed bollards, we drill a hole (often 300–500mm wide) to the depth needed. We then set the post in concrete or secure it with a baseplate. For removable bollards, we install a sleeve in a concrete footing.
Finishing Touches: Once set, I often paint the bollards or add reflective tape. Some have rubber collars or caps for visibility.
Final Check: I double-check the alignment and make sure they’re highly visible from all angles. If it’s a cluster installation, I ensure spacing is consistent.
A pro install typically takes a few hours per bollard (including concrete curing). You can DIY to save costs if you’re handy, but I always say: get it right from the get-go. A loose bollard or misaligned post can cost more in repairs later.
Cost of Bollard Installation
Everyone wants the number. “How much will this bollard project set me back?” I get it. Costs vary, so here’s a ballpark:
Item
Cost Range (AUD)
Notes
Fixed steel bollard (supply)
$150 – $300+
Depends on height, diameter, finish
Removable bollard kit
$200 – $500
Includes post + sleeve system
Labour + installation (each)
$300 – $600
Concrete work and fixing per bollard
Flexible plastic bollard
$50 – $100
For low-impact use cases
So, installing one steel fixed bollard might run you $450 to $900 in Melbourne, all up. If you need multiple, tradespeople often offer a package deal, so ask for a quote on a group.
A few cost-saving tips: – Stick to standard sizes: Custom heights or fancy curves can blow up the price. – Batch your installs: If you’re doing several, get one call-out for the concrete drill; it’ll save time and often money. – Plan your layout: Fewer bollards with smart spacing (typically 1.2–1.5m apart) can protect just as well and cost less.
Where to Use Bollards
Bollards are everywhere in Australia. Here are the hot spots:
City Streets and Pedestrian Zones: To keep cars out of walkways, malls, and outdoor dining areas.
Home Driveways: Many Melburnians use removable bollards to prevent double parking or unwanted access to their driveways.
Car Parks and Garages: Bollards protect storefronts, structural columns, and walls. You’ll see flexible bollards lining indoor lots.
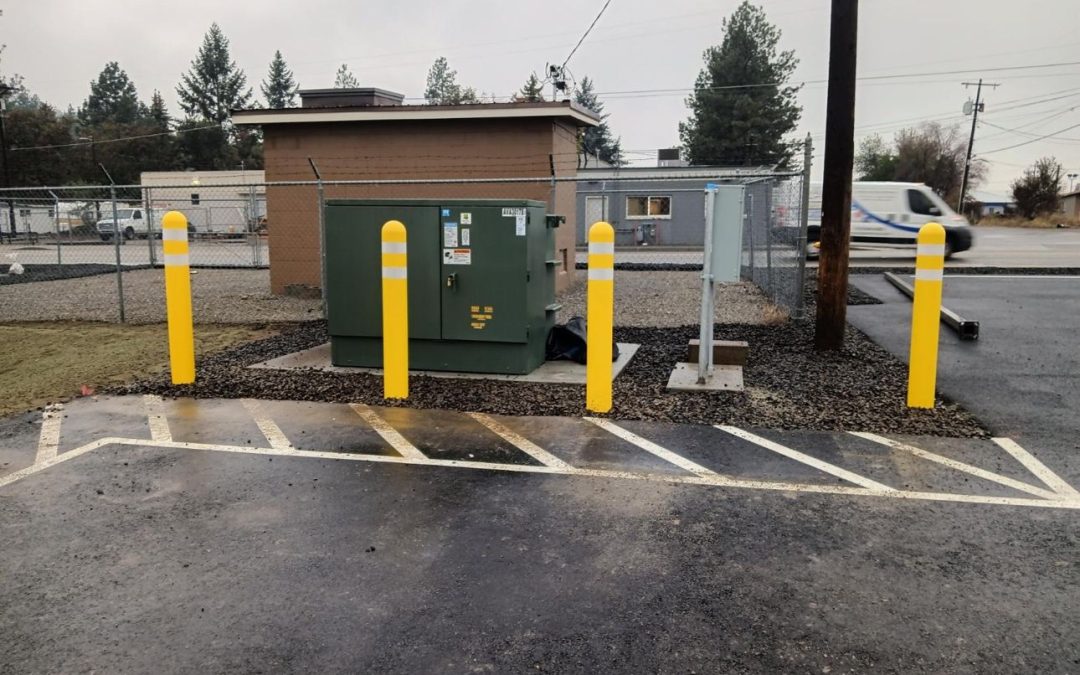
Shopfronts and ATMs: A lot of shops install bollards against ram-raids. I’ve fitted sturdy posts in front of ATMs and storefronts to fend off smash-and-grabs.
Parks and Heritage Areas: In places with a historic vibe, cast-iron or timber bollards keep cars out without looking out of place.
Industrial Sites: Steel bollards safeguard machinery and buildings from forklifts and trucks.
Each setting has its style. For example, we installed pastel-coloured bollards for a local café, so they matched the fun branding. In a heritage zone, black iron posts blend right in. There’s no one-size-fits-all – that’s part of the fun.
Safety, Standards and Regulations
Time to talk rules. In Melbourne (and statewide), bollards must be safe. The urban design guide says locate bollards to allow free pedestrian movement while controlling vehicles. In short:
– Keep walkways clear: Don’t block footpaths or ramps. Leave at least 1.5m passage. – Be visible: I use reflective tape or bright paint so drivers see the bollard day and night. Some folks even add lights or reflective studs. – Accessible design: Vision-impaired people should be warned of a bollard’s presence (tactile ground surface indicators can help). – Get permissions: If your bollard touches any public asset (footpath, kerb, utilities), you likely need a permit. Even on private land, check any building codes that might apply.
Following these simple checks makes sure your installation is solid, legal, and truly protective.
Conclusion
Installing bollards might not sound glamorous, but it’s a savvy move for safety and style. We’ve covered how to pick the right type, material, and installation method for your Melbourne property. Whether you need a simple driveway post or a row of city street bollards, I hope you feel ready to make an informed choice.
Ready to lock it down? Measure your space, list what you need (fixed vs removable, height, etc.), and get a couple of quotes. A quick chat with a professional Bollard Installer can clear up any remaining doubts. Do it right, and you’ll drive away with total peace of mind (pun intended).
Frequently Asked Questions
Can I install a bollard myself?
If you’re handy, yes – for small jobs you can DIY by following safety steps (check underground services, use proper concrete mix). But for heavy-duty jobs or public areas, I recommend a licensed installer.
How deep should a bollard go?
It varies by height, but a good rule is bury about one-third of its height. For example, a 1200mm post often has ~400mm in concrete below ground.
Do I need council approval for bollards?
For private driveways and yards, usually not. For public spaces (footpaths, parks, heritage streets) you almost certainly need permission, so check with City of Melbourne or Vic Roads.
What’s the ideal spacing between bollards?
To let people pass easily (including wheelchairs), 1.2–1.5 metres is common. Always leave a clear 1.5m path, or a minimum 1.2m, between them.
Should bollards be lit or painted?
If they’re on a street or in a parking lot, definitely add reflectors or lights. Solar-powered bollard lights are popular for pathways. For dark corners, I sometimes use bollards with built-in LEDs.
What if a vehicle hits a bollard?
Well-installed steel bollards withstand a lot, but a heavy hit can bend or break one. Flexible bollards flex on impact and keep their shape. After a big hit, you’ll inspect and repair as needed (better it hit the bollard than your shop front, right?).
Can bollards improve property value?
Not directly, but they improve safety and compliance, which buyers appreciate. A well-protected space feels more professional and secure, which is a subtle selling point.